Monday 29 February 2016

February in Review...

Sewing:

Sewing has taken a hit this month as I was feeling under the weather with a stomach flu in the beginning of the month. And I'm ending the month by putting in longer hours at work and fighting a cold. It kind of puts a damper on any thoughts of sewing. Despite this, I was able to make hide many sewing bloopers within the few seams I sewed and came out with one completed project: a new shirt dress.

I'm currently working on a cape that is taking me much longer to complete than I anticipated it would take to make.


RTW Fast:

No ready-to-wear items made it into my wardrobe and I wasn't even been tempted. Woohoo!

Mind you feeling under the weather and all those pastel colours found in the retail landscape helped with the lack of temptation.


Stats:


Supplies
Quantity Used from the stash this Month
Quantity Used this Year
Added to the Stash this year
Basting Tape
0
0.40 metres
0
Bias Tape
0.01 metres
0.01 metres
0
Buttons
14
15
0
Chain
0
0
0
Elastic
0
0.8 metres
0
Fabric
2.5 metres
13.35 metres
20.5 metres
Hand needles
0
0
0
Hook and Eyes
0
0
0
Interfacing
0.30 metres
0.30 metres
10 metres
Lace trim
0
0
0
Pattern (new)
0
4
5
Pattern (previously used)
1
2
0
Ribbon
0.50 metres
0.50 metres
0
Serger needles
0
0
0
Serger thread
0
0
0
Sewing machine needles
3
3
0
Snaps
0
0
0
Thread
0
2
22
Trim
0
0
1.8 metres
Velcro
0
0
0
Zipper
0
1
0

Happy Sewing!  

Sunday 28 February 2016

The Making of a Cape: Chapter 5 -- Collar and Facing

Another favourite detail from the Kate Spade cape was the piping found between the lining and fashion fabric on the inside.


On the Kate Spade cape it was black piping but I went with a taupe, sort of on the gold side. Very out of character for me to choose this colour but I like it.


I took the time to sew the piping before basting and sewing the collar to the facing pieces.


Sewing through all these layers, the walking foot certainly proved to be a valued tool.


The collar on the vintage Simplicity 6680 pattern is one of my favourite details on my cape. I prefer this vintage collar design over the cutesy collar found on the Kate Spade cape. And I won't be copying the signature bow on the back either. I much prefer the clean tailored lines of the collar on the vintage pattern.  

Until the next chapter, happy sewing!   

Thursday 25 February 2016

22 Minutes: 100 Years of Canadian Beauty


Yup.  This just about sums up dressing for a Canadian winter as I try to finish up the cape, not the most practical winter garment. 

In other sewing news... The work on the cape is happening at a snail's pace this week since I'm putting in some overtime, prepping for sewing club on my own time, and coming home way too exhausted to even dare to get into it. Since the last chapter, I managed to baste the under collar to the cape. And then the next night I stitched it in place. And last night I sewed the front facing to the back facing and feeling ambitious, I stay-stitched the facings.  Yup, I am seriously moving at a snail's pace. At this rate this project risks becoming an unfinished object (UFO) or it might get done in time for autumn 2016 if I can find some me-time.  

Happy Sewing!

Sunday 21 February 2016

The Making of a Cape: Chapter 4 -- Pad Stitching

The last few days I've been taking care of the front to side and side to back seams along with darts. There are two sets of darts, one at the shoulder seam and another at the back neckline. Simple stuff really.


Nothing really worth dedicating a chapter to but I thought you might like to see how the cape looks at this point.


It is no where done but it feels great to slip it over my shoulders and slide my hands into the pockets. But enough of playing dress-up, there's still a lot of work to do. Let's take a look at the next new-to-me technique involved in this cape.

The vintage Simplicity pattern that I am working on has one short sentence stating, "[s]ew with padding stitches." End of sentence. There are no glossary terms or explanation of padding stitches to be found anywhere on the instruction sheet.

My education on this new-to-me technique began with a pile of books. I'm ol' school like that, preferring to do traditional research over watching videos. And I would have guessed that the greatest wealth of information would be found in the vintage sewing books but really I found some words of wisdom from a variety of sources.

Sew A Fine Seam by Violet I. Wilson, copyright 1955, offers some pointers that I found helpful. There are not a lot of illustrations to go with the detailed descriptions.
  • The stitch is taken at the right angles to the marked line about 1/4 inch apart.  
  • Check for 1/4" variance on collar pieces. 
  • Keep the threads slack.  
Another wealth of information came from The Sewtionary by Tasia St. Germaine. This book offers colour pictures and tips that I found helpful.  
  • Use silk thread to pass through the hair canvas with ease and to limit impressions in the fabric.
  • Wrap the undercover around a tailor's ham to steam to shape the collar after it has been pad stitched and leave it overnight to dry.  
Vogue Sewing, circa 1980, provided some important information about determining the roll not only on the under collar but on lapel as well. Unlike the Kate Spade cape my vintage Simplicity pattern does have a label. Vogue Sewing continues with a wealth of information on how to stabilize the roll as well. It was the time that I spent reading these key pages in Vogue Sewing that made me decide to go back and pad stitch the label as well.  

The geek that I am was quite interested in the information found in the Reader's Digest Complete Guide to Sewing, circa 1978, where I discovered two new terms relating to the padding stitch. There are the Chevron padding stitch and the parallel padding stitch. Most books illustrate the Chevron padding stitch where each row of stitches are in the opposite direction so that they appear as a herringbone weave. The Parallel padding stitch are made when each row of stitches are in the same direction.  

So how did it turn out?


Right now the under collar is currently drying on the tailor's ham as I go back and pad stitch the label.


Until the next chapter, happy sewing!


Friday 19 February 2016

The Making of a Cape: Chapter 3 -- Welt Pockets

I took a detour from the vintage pattern instruction sheet to add a modern twist to the seventies cape pattern. I want pockets like those found on the Kate Spade cape. Aren't they just sublime?  


Of all the cape patterns that I was tempted by, I couldn't recall any that featured pockets. Now, where is a gal supposed to put her essentials without pockets?  

The JoeyBra {Source)
Yes, the fashionably hip might suggest the JoeyBra. But seriously, a gal my age could dislocate a shoulder trying to utilize the JoeyBra in the frigid prairie winters while wearing a cape. And that is how I found myself on the road to adding pockets. It was a road previously untravelled. Sure, I have sewn pockets before, side-seam pockets, side-front pockets, patch pockets and that is about it. I have never sewn a welt pocket before. 


And this is where OOP Vogue 8863 comes into the picture. I read a review that praised the pockets on this jacket and check it out, a welt pocket just like on the Kate Spade cape.  


Oh my! I was excited to start on this journey into unknown territory but I knew I needed some encouragement. Since Claire Shaeffer proved to be an inspiration on the trek towards bound buttonholes bliss, I turned to her soothing voice to lead the way.


I found Claire's words of wisdom via Thread Cult podcasts by Christine Cyr Clisset (#29 to be exact).


As Claire guides me through the difficult task of hand basting all those layers of wool and horsehair interfacing,


I continue on with the promise that hand stitching is the golden goose of the sewing world. Or something along those lines.


Between kAtheRine Tilton's excellent pocket pattern, instructions, breaking down and finally wearing a thimble, and Claire Schaeffer's encouragement, I completed my first welt pocket. Actually, I made two!


Until the next chapter,  happy sewing.


Wednesday 17 February 2016

The Making of a Cape: Chapter 2 -- Bound Buttonholes

Many delightful details were found in the Kate Spade cape I tried on. I was impressed by the bound buttonholes, a technique that I longed to master.


I tried Tasia St. Germaine's method found in The Sewtionary while working on a spring coat, yet to be finished. But I didn't want to revisit this method.


And goodness knows, there are many ways to do a bound buttonhole as an internet search will reveal. And there lies my problem, I haven't yet discovered a method that I'm comfortable with for this project.


I decided to try Claire B. Shaeffer's method next. In her book, Couture Sewing Techniques she points out that there are various methods for making bound buttonholes and I wonder if this is why I have yet to find detailed instructions in pattern sheets. Could it be that there is no consensus on a universal method to do bound buttonholes?  She offers the patch and strip methods in her book but I chose the  method that Claire Shaeffer shares here.  And the practice bound buttonhole turned out fine.  


This practice bound buttonhole had me giddy with excitement. Words can not express how giddy. I changed the thread on the sewing machine, basted and marked all the markings and set to work.  


Perhaps, the excitement of that practice bound buttonhole got in the way of my clear thinking and I sewed my stripes to the wrong side of my fabric! To be completely honest my ability to laugh at this error was based on the fact that I had some more fabric if I needed to cut another front. But Mama R had a suggestion when I told her what happened.

"Why don't you take them off and sew them to the right side?," she asked.

I explained that I had stitched them in place with 1.5 length stitches and with my red thread perfectly matching my fashion fabric I'll never get in there with a seam ripper.

"Not even with the new seam ripper?," she questions my illogical response.


What is wrong with me?, I thought to myself recalling how crazy awesome the Pro Seam ripper works. And that is how the bound button blooper was fixed. I carefully cut out the stitching, finished basting and thankfully have some beautiful bound buttonholes.Thanks Mama R!


The stripes are created by folding a length of scrap fabric, pressing and then stitching 1/4" away from the fold. The length is calculated at the width of your button plus an additional inch.  Then I stitched the strips in place matching where I basted the placement lines.


I clipped between the two stripes and then diagonally into the corners.


And then I turned the ends over and stitched the triangular end in place before trimming the excess from the ends.


I turned over my front to check out the button hole and steam pressed using the clapper. I finished by diagonally hand-stitching the opening closed and now I can proceed with the next steps.

Stay tuned for the next chapter, until then, happy sewing.  

Tuesday 16 February 2016

The Making of a Cape: Chapter 1 -- Plotting and Planning

I have been talking about making a cape for months now, many months actually. Since last summer when I was anxiously waiting for McCall's 7259 to appear before I headed back to work and a much busier schedule. 

McCall's 7259 from The Archive Collection, circa 1927.    

And then a few weeks later I was dazzled by the new Marfy cape pattern from their Autumn / Winter 2016 collection.  

Mary Cape, F3757 

I didn't pick up the Marfy cape fearing that it would be beyond my skill level to sew an expert level pattern that doesn't come with instructions. The McCall's pattern made it into my stash but I was on the fence once I got my hot little hands on it. Commitment is hard sometimes.   

I found a new cape love for a vintage pattern that I couldn't resist. I was thinking that it would be cute in a brown and pink tweed that has been maturing in my stash.   

Simplicity 6680, circa 1974.

Falling back into a new routine, I didn't make a commitment to the project until I actually tried this one on. Oh Kate Spade, you made one beautiful cape.  


And maybe it was the Christmas season but I was sold on a red cape, changing my mind about the brown and pink tweed. 


I was full on board when I picked up some red melton wool, red cotton-backed satin lining and even red buttons. I'm all in!  


I even made a muslin. I never rarely make a muslin, until now. I had researched the details of the Kate Spade cape online, took pictures in the changing room, and noted the details that I wanted to recreate. As I planned, I also prepped, researching the best method to pre-shrink my wool fabric without taking it to the dry cleaners. Two damn towels, a tumble in the dryer  and a whole lot of lint to clean out of the lint trap, I'm all set to get to work.

And so the journey begins.    

Happy Sewing!  


Monday 15 February 2016

Happy Louis Riel Day!


Happy Louis Riel Day! Other parts of Canada may be celebrating Family Day, long but interesting story, you can read about it here. Anyway, whichever holiday you are celebrating, wishing you and yours fun festivities. 

In honour of the holiday, I'm offering a 30% discount over at the Etsy shop if you use the coupon code RIELDAY, available until February 18th. 


Saved! (On So Many Levels)

Stash-busting 2016:  The Day Dress


Or as Mr. Gunn would say, the never-fail shirt-dress. Of course, Tim Gunn wasn't around to witness all the sewing mishaps as I tried to "make it work."


After the many mishaps it did work and I finally (and thankfully) have a shirtdress.


I used Butterick 5760, an out-of-print (OOP) pattern that is still found on their website. So, I don't mind if you go pick it up before you continue reading because this is one great pattern. This is only the second garment that I made with this pattern and so far, I have no complaints. I've made 
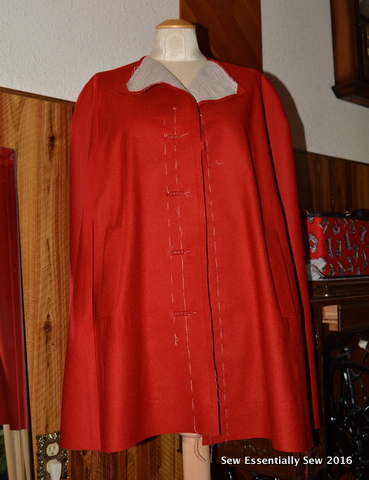
the cardigan and now the dress and both patterns are well-drafted classics. Based on these two pieces, I would say that this pattern is a very good value. The instructions are well written and illustrated as well. I will even go as far as recommending these two pieces for a beginner.

Talking about the instructions I did find something quite interesting in these instructions,
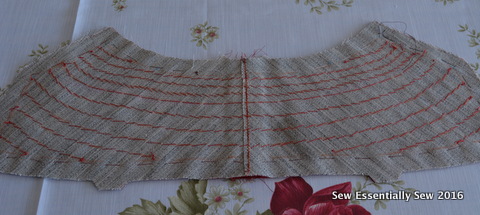
Turn long edge of FRONT (14) to wrong side along outer foldline; press.  Baste across upper and lower raw edges.  Sew invisibly on long edge.  
Sew invisibly! I haven't come across this term since I stumbled across it in a vintage Vogue Sybil Connolly design. (One day, I will finish that coat.) I quickly searched for the first instruction sheet to see if this term was listed in its glossary. Nope. Only sewing terms appearing in bold type were explained in the list of glossary terms. Present in the list: easestitch, edgestitch, finish, reinforce, slipstitch, staystitch, topstitch, and understitch. Maybe there is an assumption that home sewists would already know what sew invisibly means and that is why this pattern is given an average rating?

I didn't baste or sew invisibly because I thought it was an unnecessary step was being lazy. Instead, I finished the long edge on my serger then folded and steamed pressed along the fold lines.

I was drawn to this shirtdress design because there's no waistline seam, darts, and the relaxed fit. The fact that it has pockets is an added bonus!


Although, I did have some challenges with the pockets.  

The only changes that I made (other than changing the method of treating the self facing) were shortening the sleeves, adding two inches to the length, and increasing the number of buttons on the front. I cut the dress in a size 14 but graded up to a size 16 towards the hip area.

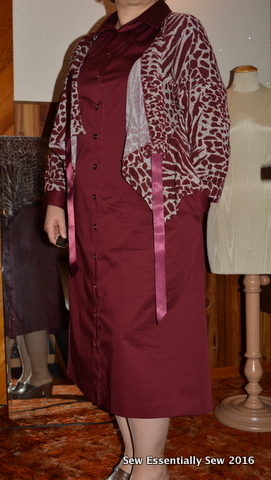
Ohhh, and it matches the Marcy Tilton jacket I made a few months ago!
Vogue 8975

The retro metal buttons were a bulk find at Northwest Fabrics. With fifteen buttons,  I was able to add two more buttons to the front band than was suggested on the pattern envelope. In doing so, I was able to reduce the distance between the buttons and spaced them every three inches. Even though I have an extra button, I omitted the button from the collar band since I would never wear it buttoned at the collar.


The sateen fabric, from Fabricland, was pretreated with a tumble in the washing machine, dryer, and steam pressed before it was cut. Sateen is one of my favourite fabrics to sew and I have to say I really do like this colour as well. It has a slight stretch making it an extremely comfortable day dress.


The Stats:

Fabric:     2.5 metres cotton sateen $18.65 ($22.00 / metre - 70% off + taxes).

Interfacing:  0.30 metres fusible interfacing $1.70 ($10.00 / metre - 50% off + taxes).

Buttons:   15 - 12 mm $2.25 ($1.99 + taxes).

Pattern:     OOP Butterick 5760 (already priced out here).

Thread:     $4.00 averaged out cost to cover thread for the serger and sewing machines.

Needle:     80 / 11 Ball point sewing machine needle $1.69

Ribbon:     0.5 metre $0.20 ($0.35 / metre + taxes).

Basting Tape:     1 cm strip $0.00 (Birthday gift).

Time:        Approximately 12 hours (spread over a couple of weeks).

Additional Tools and Supplies:  Sewing machine, serger, washing machine, dryer, scissors, pins, hand needle, seam ripper, Fray Check®, steam iron, sleeve roll, tailor's ham, Thread Cult podcasts, black currant tea, honey, box of kleenex, tylenol, a dash of forgiveness to prevent any cursing directed at my clumsiness, more tylenol, a whole lot of patience, countless number of naps, what felt like hundreds of hours of labour (Oy, the time spent sewing all those buttons!), and the ability to laugh at one's own mistakes without giving up on a project. And some more tea.

Price comparison:

I found a sateen shirt dress listed for $199.00, on sale for $49.00 plus $50.00 shipping from New Zealand.  I couldn't find any North American sateen shirt dresses in stock, I guess they're not big sellers in the winter months. But I digress...

I could have easily purchased a sateen dress cheaper than I made it considering the labour and supplies that went into this project. But I would not have this burgundy dress that fits me the way I like. Not only do I have a dress that is at a length that I prefer, it has long sleeves. My version also has metal retro buttons that I think are too cute and more durable than the plastic buttons typically found on RTW garments today. And I really like that the Butterick pattern has a nice fit without the darts found on the ready-to-wear version. It is the main reason that I sew, besides the challenge of "making it work," I can make clothes that fits my body! Most times a good fit is impossible for me to find in the RTW landscape.


Happy Sewing!


Sunday 14 February 2016

Happy Valentine's Day

For this was sent on Seynt Valentyne's day
What every foul cometh there to choose his mate
~English poet Geoffrey Chaucer~

Oh yes, that commercial holiday of Love that makes merchants giddy with glee. Many believe that we  have Chaucer to thank for the romantic festivities associated with this day. The association between romance and St. Valentine's feast day did not exist until Chaucer's work "Parliament of Foules" was penned in the 14th century. Prior to this invention, St. Valentine was known as the patron saint of beekeeping, epilepsy, travel, the plague and fainting. How St. Valentine's holy duties moved from these to overlook the woes of love struck folks is stranger than fiction.  None-the-less, I do love honey so I'm happy we have a patron saint of bee keeping.  

Olive Rose Dolls:  Honey Bee
{Source}

I also love sewing. Let me count the ways...

1.  There is no greater sense of happiness than seeing a smile on Mama R's face when she's thrilled with a new garment.  As a general rule, I don't sew for others, but Mama R is an exception to the rule. Sewing for Mama R is an absolute pleasure.  


2.  With a piece of fabric, a sewing pattern, some thread, embellishments and a sewing machine I can create designer looks that no way would make it into the clothing budget.  Some of my favourite designer pattern to sew have been Lynn Mizono, Marcy Tilton, kAtheRine Tilton, Donna Karan, Sybil Connolly, and Issey Mikaye creations.  


3.  Forget jig-saw puzzles, if I want a real mental challenge I would take a flat piece of fabric and shape it into a 3-D object.  Issey Miyake, Marcy Tilton, and the Centre for Pattern Design offer up some creative mental workouts when I feel like being challenged.    


4.  Is there a greater feeling than knowing one can make something better than is found at the store? When I sew, I'm in control of how many buttons I want to add to a garment rather than picking up something that has been made as cost-effectively as possible. And I can finish my seams the way I like, couture techniques anyone?


5.  I love that I get to participate with a vibrant online sewing community that is supportive, generous with their ideas and talents and they get it when it comes to this hobby.  From the RTW Fasters to meeting people in person who I initially met on line, all-in-all I've met good people.  
  

6.  I can end up with a one-of-a-kind item or I can copy a style trend seen from a retailer. But really, why would I copy a style when I can end up with a one-of-a-kind item?  


7.  I get to share this hobby with eager students who want to express their creativity.  It is so sweet to watch kids get excited about sewing.  


8.  I love that when I'm stuck on sewing technique that help is just a keypad away.  Whether it is a posted tutorial, a response to a question, or a tip shared on Pattern Review, help is close by.  


9.  That moment when you unexpectedly trip head over heals in love with the perfect piece of cloth and your creative juices start racing a million miles a minute.  Yes, I believe in love at first sight when it comes to that perfect find at the fabric store. 


10.  I love that sewing is a source of laughter and joy. Whether it is sewing bloopers and having a good chuckle over it, gifts for friends and family, or if it's waking up to the latest weekly Wearable Wednesday posts, I am thankful for the laughs and joy that sewing has brought in my life.  


Well, wishing you a Happy Valentine's Day and Happy Sewing!  


Stash busting: Wool cardigan / OOP Kwik Sew 4192

Back in September, I made a simple pull-on  wool knit skirt with the intention of sewing a matching pullover top  to go with it.  The pullo...