Tuesday 31 January 2017

January In Review...

Sewing:

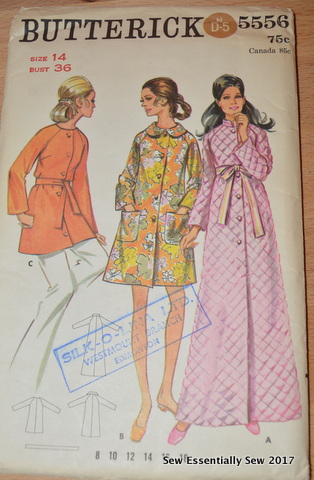
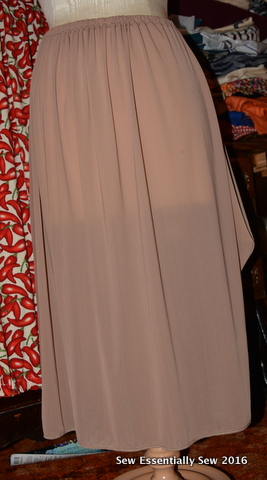
Top L to R:  Coat, a Marcy Tilton design, Vogue 8934; waffle weave cotton robe, vintage Butterick 5556; half slip, Vogue 1410; knit cape-styled top, McCall's 7541; floral print top, Vogue 9028; two full slips, OOP Burda 6964; cotton dress, Simplicity  2372; animal print top; OOP McCall's 7946; two camisoles, OOP Burda 6964; three microwave bowl cozies.  
I spent 92.75 hours on sewing projects this month.  It turned out this is how I spent most of my free time while laid off from work. And then work at the sewing table slowed down to a halt since sitting is proving to be quite painful after a nasty fall. I'm anxiously counting down until I can enjoy some more sewing time, soon I hope. Five out of the fourteen items I made were for moi, two were for the Etsy shop and the rest were gifted to Mama R.

I only made one item for Jungle January, a tee-shirt. There were big plans as I started off the new year plotting my participation.


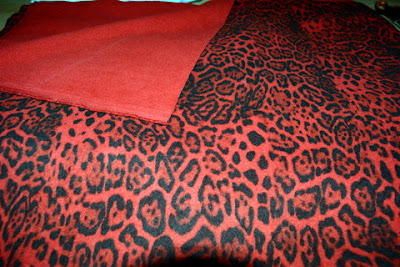
I picked up this piece of fabric last year after I made the cape. I thought perhaps another cape? The plan changed when Vogue 1494 came onto the scene. But then plans were interrupted.

  
And these jungle-worthy fabrics were also planned for something frisky to wear. The animal print above has been in the stash for years and I had a top in mind using OOP Butterick 5561. The lighter coloured fabric found it's way into my collection, waiting to be turned into a pussy-bow styled shirt using Vogue 9029. I won't be packing them away because Anne is right, we should let our animal prints roam outside of Jungle January festivities. So when my injured parts are mended, I'll try to get on that.   

RTW & Fabric Fast:

Woohoo!  Another month without buying any ready-to-wear. I wish I could say the same about fabric fasting. I stumbled this month in that department.

Fabricland had a sale on kasha lining fabric which rarely goes on sale so when it does, I try to pick some up. And then there was some linen, lobster print cotton and black wool in the 70% off department that I couldn't resist. Even though I didn't uphold to my fabric fast I did stay true to avoiding man-made fibres. Since I haven't been able to sew since the injury, I shopped for fabric to make myself feel better. My bad. It didn't work, I much rather prefer to be sewing.


Just like the RTW fast in it's early days, this fabric fast thing is turning out to be quite the challenge. I'll try again next month.  


The Stats:


Supplies
Quantity Used from the stash this Month 
Quantity Used this Year
Added to the Stash this year
Basting Tape
1.12 metres
1.12 metres
0
Bias Tape
1.8 metres
1.8 metres
0
Buttons
14
14
6
Chain
0
0
0
Cord Stopper
0
0
0
Elastic
0.8 metres
0.8 metres
0
Fabric
22.2 metres
22.2 metres
16.9 metres
Fusible Tape
8 metres
8 metres
0
Hand needles
1
1
0
Hook and Eyes
0
0
0
Interfacing
2.1 metres
2.1 metres
1 metres
Lace trim
2.6 metres
2.6 metres
0
Pattern (new)
3
3
2
Pattern (previously used--TNT)
5
5
0
Ribbon
0
0
0
Serger needles
0
0
0
Serger thread
3
3
0
Sewing machine needles
0
0
0
Snaps
0
0
0
Thread
6
6
3
Trim
0
0
0
Velcro
0
0
0
Zipper
1
1
0

Happy Sewing!

Sunday 29 January 2017

Elevated Utilitarian Attire

This weekend's Globe and Mail contains a review of a Toronto exhibit, Workwear, exploring the way we dress for our jobs. The review opens with a historical look back at pioneer fashion photographer, Irving Penn, who in the early 1950s turned his camera lens towards an ethnographic look at utilitarian attire of the day.  

Parisan Bakers, photographed by Irving Penn

He captured pictures of everyday people, not models, in the clothes that they wear during their work day.  

Parisan Butcher, photographed by Irving Penn

These photographs are a true treasure not just from an anthropological approach. They capture the individuals in a specific time and place that is lost to us in the present. Certainly, we do have butchers and bakers in our present-day culture but they do not dress like this in our present day culture. When was the last time you encountered a butcher wearing a button-up shirt, necktie, dresspants and shoes at your butcher counter? That wasn't in a film. Yeah, these are images from a by-gone day. If we compare it to the uniforms of today's workplace you might come to the immediate conclusion that today's workers are dressed more comfortably. However there may be more to the story that can not be revealed in a photograph.  

And that is where Workwear comes in. According to the Globe and Mail article the depiction of work wear today and in the future is portrayed by actual clothing on display, elevated by designer names behind them. On the surface it may appear to be a fashion exhibit but it seems to also read as a nature vs. technological exhibit as not only has workplaces changed, so have textiles.   

Has anyone seen Workwear? It is on until April. I wish I could see it, I'm so intrigued. But as a working gal in another city without any holidays, it doesn't look like it will be in the cards.  


Friday 27 January 2017

That Was Fast!

Wow!  I'll admit, I'm impressed with how fast my most recent Vogue order took to arrive in my mailbox. Nine days from the time I ordered, that's never happened before. It typically takes a good month to get across the border. Of course, this speedy delivery occurred when I can't sit for very long. Oh Saint Anne, the Patron saint of seamstresses, seems to have a sense of humour, doesn't she?  


I'm still thrilled even though the projects I'm eager to sew may take me awhile complete. At least I can cut the projects out. And can I say that I'm also impressed with these labels. They're lovely and I think while I'm sitting on my coccyx cushion the first thing I'll do is sew one of these into my burgundy Marcy Tilton coat.   

Hopefully, I'll get to Vogue 9244 shortly.  

Happy Sewing!  


Sunday 22 January 2017

Microwave Bowl Holders

I'm back at the sewing table much to my surprise. Mind you I'm not sewing at top speed but at least I'm sewing.  


I wouldn't have managed if it weren't for this cushion that makes it bare-able to sit with a tailbone injury. Not for long though. Just long enough to stitch up these. Thanks to Birdmommy for the suggestion.  


More microwave bowl holders. The first two in the front are for a custom order. The one in the back is for Mama R.  


She's quite smitten over this print so how could I not make one especially for her. 


The Stats:  

Fabric:  0.5 metre quilting cotton

Thread:  100% cotton

Needle:  Universal sewing machine needle

Batting:  0.45 metre Wrap-N-Zap microwave safe cotton batting

Time:  I invested 6 hours into the preparation of the fabric and the construction of these items.  

Additional Tools & Supplies:  Sewing machine, walking foot, sewing & knitting gauge, screw driver, pins, scissors, iron, ironing board, coccyx cushion, Tylenol, and a latte and heating pad break.  

Happy Sewing!  


Friday 20 January 2017

In Sewing News Today...

It has been a week since I last touched anything in the sewing room. It makes me sad because I want to sew I just can't sit with my injured tailbone and the injured knee doesn't help with this situation.  Instead, I've been longingly dreaming about sewing in-between long showers stretching out sore muscles.  

If I can sew right now I would make a t-shirt that reads, "stop telling me to stretch, it's my arse that hurts" because if one more non-medical person tells me to stretch I'm going roll my eyes at them and limp away.  ~sigh~  I know people mean well, but seriously, do they think they're telling me something I haven't already heard?  

Instead, I've managed to shop for future sewing projects. Thank goodness for laptops when laid-up. During the recent Vogue patterns sale I picked up just one pattern. I was tempted by many more but there is only one pattern that fits into my current life-style. 

I can't wait until I can get back to sewing as I already have fabric waiting in the wings.  


These two stable knits have been in my stash for years, and I think Vogue 9244 will be perfect for this project.  


I also picked up some Vogue designer labels. I really want to sew one into my Marcy Tilton coat.   


Talking about the coat, I picked up this caplet pattern.  


The plan is to make the caplet in a faux fur that I picked up last year. It is the perfect colour match with the coat I recently finished. It will be my first time sewing a fabric with a pile this high. The salesclerk recommends trimming down the pile along the seam allowances.  I'm going to have to do some practice sewing first.  


I also found this pattern over at Etsy.com, OOP Vogue 9814. I really like the draped front and it can be made in a knit or woven fabric. If I can't sew for the meantime, at least I can dream about sewing.  

Well, that is all in sewing news today. Until next time, happy sewing.  


Sunday 15 January 2017

Butterick 5556: Vintage Style Robe

Vintage Butterick 5556 should have taken me no time to whip up especially since I had it all cut out and ready to go on Monday night.  


Butt it proved to literally be a pain in the arse to sew. You see the day that I had plans on sewing this project up after work, I fell and this week there hasn't even been an ounce of desire to sew. I have a bruised tush and my back is killing me. What should have taken me a few hours to sew took me the whole day. Moving the sewing machine on the cutting table abled me to sew while standing up and allowed me to avoid the prospect of sitting down to work on this robe. I finally have this project done after many hours of sewing spurts followed by some quality time with a heating pad and repeat. I'm amazed it's finally done.  


This robe is for Mama R. After she saw the little robes I made for my co-workers' kids she mentioned that she would like to have one but I knew that she's not one for the tie belt versions found in the pattern books and retail landscape. 

The request sent me on a search over at Etsy and it was there that I found out-of-print Butterick 5556. I'm guessing that it is from the 1970s based on the illustration on the pattern envelope and the detail in the construction of this robe. They don't make patterns like this anymore. This pattern is for a fully lined robe! This robe doesn't have a lining it but I might one day revisit this pattern and sew it up as intended. It is a well-drafted pattern and I really like the shoulder dart that extends into the sleeve area, it really gives the sleeve a lovely shape.    

I did make a few changes other than leaving out the lining. The sleeve length was shortened, more ease was added to the mid-section of the robe and the pockets were raised several inches.  

The waffle weave cotton fabric is the same fabric used in the previous robes. It was pre-treated with a tumble through the washing machine and dryer. It handled the pre-treatment process without any issues. The fabric was a 2016 find in the bargain centre at Fabricland. I scored it for a song because there was some fading at the fold-line which I couldn't avoid when I cut out the back piece on this robe. Mama R doesn't mind the fading and even though I offered to hide it with some creative trim detailing she wasn't interested claiming that it doesn't bother her. I think it bothers me more than it bothers her. The centre back is supposed to have a seam, but Mama R preferred if it didn't and wanted the back cut as one piece. 

Now that I have this project off the table and into Mama R's hands, I think I'm going to stop sewing until I'm all healed up. It might be a while according to the physiotherapist. I think I just need to listen to the physio-therapist and take it easy for now.   


The Stats:

Fabric:  3 metres

Interfacing:  1 metre

Buttons:  6 - 1/2" buttons

Pattern:  OOP vintage Butterick 5556

Time:  I invested 13 hours into the preparation of the fabric and the construction of this garment.  

Additional Tools & Supplies:  Sewing machine, serger, threads (for the machines and hand-stitching), cutting table, sewing needle, scissors, pins, wrist pincushion, wrist brace, heating and massage pad, Magic bag, meds, a lot of breaks, tea, and a nap.  

Happy Sewing!  


Tuesday 10 January 2017

Vogue 9028: A Comfortable Top

Vogue 9028, circa 2014, is a somewhat recent addition to my pattern collection. It happened this past summer when Fabricland was selling off Vogue patterns for $5.00 after a shipment came in from another province. Otherwise, I would have overlooked this pattern. At 40% off (with a membership discount) a $29.95 (Cdn $) pattern, I didn't think it was worth the expensive for a basic top. At five dollars, I was willing to pick up a pattern that I wasn't sure about and give it a try.     

And I'm glad that I did. This is a really comfortable top and I really like how the shoulder seam is cut. It is loose-fitting, I like that as it is easy to move in. 


I work in at a job that has a "professional dress code" yet my job is physical and messy. I sweep, kneel, get sneezed on, and sometimes worse. It is just difficult to find something that fits the criteria with the reality of my job. I wish our dress code would be classified as "smart casual" but it's not, so my fingers are crossed that I can get away with this top as part of my work wear rotation. Maybe dress it up with a skirt? To make it "work ready," I added pockets to the front. They are big enough to hold keys and other necessities. 


Other than adding pockets, I changed the neckline. Instead of choosing one of the collar variations offered in this pattern, I used Knit-N-Stitch™ fusible tape around the neckline, single-folded the edge down and stitched with the stem stitch. Knit-N-Stitch™ fusible tape was also used for all of the hem finishes. Dictated by the quantity of fabric, I removed the back centre seam and omitted the back zipper. Thankfully it worked out fine and I found the zipper to be an unnecessary detail as it is easily a pullover top. If I make another one (highly likely), I would like to cut the sleeve cap and armhole two sizes smaller to see if I can get the armhole seam to sit closer to my shoulder. I cut the top out as a size 14. 

The fabric was a remnant find at Fabricland, it was unlabeled but it appears to be a cotton knit. Pink is not typically a colour that I'm drawn to but this fabric made it home because it was quite the deal and I do like the print. It was pretreated with a tumble through the washing machine and dryer. The seams were sewn with the stem stitch (also known as the knit or lightning bolt stitch) with the exception of the pockets where I used a basic straight stitch, back stitch and locking stitch.  


The Stats:  

Fabric:  1.4 metres 

Fusible Tape:  1.5 metres

Pattern:  Vogue 9028

Time:  I invested 3.5 hours into the preparation of the fabric and the construction of this top.

Additional Tools & Supplies:  Sewing machine, walking foot, serger, tweezers, thread clippers, cutting table, scissors, pins, steam iron, ironing board, measuring tape and some good music with some stretching breaks thrown in.  

Happy Sewing!  

Monday 9 January 2017

Monday's Mending Pile

It is about time that I do something with the robe that has been sitting on the armchair for quite some time. Two areas need attention to make this functionable--the length of the sleeves need to be shortened and made into pockets.


There was more than enough length from these cuffs to turn into pockets. They're folded so envision double the length. After the robe was taken care of there was one more project that needed attention.   


One of Mama R's recently made slips ended up in my mending pile. Yup, that was quick.


She said when she put it on this week, it wasn't comfortable because something was scratching her at the back where the straps were. I figured it could have been a edge of the seam binding that was peaking out from the side of the top-stitching. The scratchiness could have been from the Fray Check that I used on the cut edges.  

  
I just re-stitched with the stem stitch tacking down any exposed edges. I think this should work.  Stay tuned.  

Well, that's it from the mending pile.  

Happy Sewing!  


Sunday 8 January 2017

In Sewing News Today...

Have you seen the new Spring release from Vogue patterns? Let's just say, I'm happy that I'm not on a pattern fast this year. 

Vogue 9241
I really don't need another dress pattern, and it is a little fancy for my simple prairie-gal lifestyle but my-oh-my, this Kathryn Brenne design is stunning. 

Vogue 9244

Now this Marcy Tilton design fits my life-style better. And I have a striped cotton knit sitting in my stash that would be perfect. I just need to get my hands on this pattern and get to work.  

Vogue 1531, a Julia Alarcon design, is another dress that I don't need but if I had the figure and somewhere to wear this, I would be tempted.  

My favourite of the spring release would be Vogue 9248 for this jacket and pants pattern. It is available in sizes 2 to 8 and goodness it is too cute.  

What about you, any spring patterns catching your eye and imagination?  

Happy Sewing!  


Saturday 7 January 2017

McCall's 7541: Undecided

Update:  There has been a retraction of my initial opinion of this pattern. You can find it here.

McCall's 7541 is one of the spring release patterns that caught my eye a few weeks ago. What's not to love about a cape-style top. That was my thinking when I picked up the pattern.  


Now, I'm undecided, it is not my idea of a comfortable top. The main reason is the neckline, it's too low and wide. Maybe I can pull it off with a sleeveless turtleneck dress? Other than the neckline, I like it. It is just that neckline. If I make another one, I will change the shape for sure.  

This loose-fitting top is an easy project and a quick make. I used a polyester knit that I picked up a year or two ago. It was pre-treated with a tumble through a washing machine cycle and then the dryer. The entire project was sewn with the stem stitch (also know as the lightning bolt or knit stitch). I used Knit-'N-Stitch tape for the hemline of the top. The overlay piece has a rolled hem.  


The armhole for the top is supposed to be finished with single fold bias tape but I just serged and left it since it is unseen when worn. 

Well, I'm going to have to see what I have in my closet that I can wear this with... 


The Stats:

Fabric:  2.6 metres

Fusible tape:  1.5 metres

Pattern:  McCall's 7541

Time:  I invested 6.25 hours into the preparation of the fabric and the construction of this item.

Additional Tools & Supplies:  Sewing machine, serger, walking foot, tweezers, cutting table, scissors, pins, thread clippers, water and stretching breaks.   

Happy Sewing!  


Friday 6 January 2017

Jungle January Project: Animal Print Top

There is just something about putting on an animal print to beat the January blahs, don't you think? I was quite sad when I used this animal print fabric on a wrap dress that was just a bit too tight and ended up in the donate pile. Thankfully, the fabric has once again made it into my wardrobe as a t-shirt. There was just enough fabric left-over [insert happy dance here].


The pattern, OOP McCall's 7946, contains a favourite t-shirt pattern and it was the one I reached for to use with this remnant.  


This pattern is beyond easy. I was able to whip it up in an evening from cutting it out and sewing it. The 100% polyester fabric was pre-treated when I made the wrap dress with a tumble through the washing machine and dryer so no need to pre-shrink again. 


The Stats:  

Fabric:  1.3 metres

Fusible tape:  

Pattern:  McCall's 7946

Time:  I invested 2 hours into the construction of this top.  

Additional Tools & Supplies:  Sewing machine, serger, threads, cutting table, pins, scissors, iron, and ironing board.  

Happy Sewing!  


Thursday 5 January 2017

Burda 6964: All Pieces Are Completed!

Mama R now has a complete set of camisoles and slips. It took me longer than I planned. Slept in, dealt with waking up with stuffed up sinuses, morning coffee, break to make and eat egg nog French toast, back to work on the camisoles and slips, stretching breaks, and then finally I can call this project complete!  


I woke up to two more slips that needed the Knit 'N Stitch™ tape to be fused to the neck and underarm edges before serging, and then sewing. Mama R didn't want the bottom edges of the camisoles treated with Knit 'N Stitch™ tape. I was willing to do it but Mama R felt that it was unnecessary. Whatever Mama R wants... 


I used the same bias tape, circa 1970-80, as I used on the first camisole. The ends were treated with Fray Check™ and left to dry while I ate breakfast.  


Once they were dry and breakfast was done, it was back to work. The ends were rolled and pressed in order to cut down any potential shifting when it came to attaching them to the camisole and slips. 


The hems of the slips were finished with beige lace trimming that I found in my stash.


The lace trim is a pretty finish at the hem and will help in the prevention of the slips riding up. It is nice to finally have these done. Mama R hasn't seen them yet but my fingers are crossed that she's be pleased.  


The Stats:  

Fabric:  2.3 metres

Lace Trim:  2.6 metres

Fusible Bias Tape:  3.75 metres

Bias Tape:  1.8 metres

Pattern:  Burda 6964 (tweaked)

Time:  I invested 6 hours into the preparation and construction of these slips and camisoles.

Additional Tools and Supplies:  Sewing machine, walking foot, serger, tweezers, scissors, thread clippers, polyester thread, pins, cutting table, iron, ironing board, some fuel, and coffee.  

Happy Sewing!  


Burda: 6964: Camisoles and Slips

Mama R asked me to make her a camisole quite some time ago. I feel like a bad daughter for taking so long to complete such a simple request. Thankfully, she's just happy to finally have it and hasn't given me a hard time about the long wait.  


I'm quite embarrassed that it has taken so long to complete because this project was easy-peasy easy. The pattern is Burda 6964 but I have to admit that it doesn't look anything like the pattern photo or line drawings.


I can't find the pattern listed on the Simplicity website anymore but it does appear to be available over at Pattern Review in case you're interested. I basically tweaked the pattern according to this slip which I made using the Burda pattern. I re-cut the neckline according to the slip and used bias tape for the straps.  

The fabric I found last month at Northwest Fabrics and is the same fabric that I used to make my half slip. The fabric was pretreated with a tumble through the washing machine and dryer. The edges around the neckline and underarm areas were fused with Knit-N-Stable™tape before stitched with a narrow hem. The bottom hem was left as is after a run through the serger. Besides using the serger, the project was completed with the stem stitch (as known as the knit, or lightning bolt stitch). 

And I'm currently working on one more camisole and two slips for Mama R and hopefully this will make up for taking oh-so-long to complete this request. I should have them finished after my morning coffee. 

The Stats:  

Fabric:  0.5 metres

Pattern:  Burda 6964

Fusible Seam Tape:  1.25 metres

Time:  I invested 2.5 hours into the preparation of the fabric and the construction of these slips and camisole.  

Additional Tools & Supplies:  Sewing machine, serger, thread, iron, ironing board, cutting table, pins,  scissors, and stretching breaks.  

Happy Sewing!  


Wednesday 4 January 2017

Vogue 8934: Take Two

Yes, I did. I made another winter coat.

Only the top button is button in this shot, it has a
button fly that would conceal the buttons.

I couldn't resist since I have this beautiful raspberry coloured Italian wool sitting in my fabric stash. I quite enjoyed working with Vogue 8934 so much so that I also couldn't resist revisiting this pattern. And so my journey into coat making continues.

L to R (clockwise):  underlining pinned to lining ready
to baste, elasticized cuff construction, printed side of
underlining fabric, finished cuff.  

The understructure of this coat has some upgrades to make it prairie winter ready. I underlined it once again but this time, shopping through my fabric stash, I found a remnant that worked out just fine. It is an Eddie Bauer cotton flannel with a wildlife print. This piece has been in my stash for decades. Back-in-the-day, when my two older nephews were wee little boys, I made them wee little shirts from this fabric. That was a very long time ago. 

Back to the understructure of this coat, the other upgrade was the inner cuff attached to the lining. This time I double the width so that it has the satin finish on both sides and lengthened it just a bit. And then I sewed the wrong side to the right side of the lining exposing the seam from the inside of the sleeve. Thankfully, it is in the inside of the sleeve and the only people who know about this is you and me. Shhhh, this year's first blooper is our little secret.  


I managed to sew this project with all the materials found in my stash. The fashion fabric, 70% wool and 30% polyester blend, was also a 2016 Fabricland find at 70% off. And the Kasha lining was scored at the last Fabricland member's sale a few months ago when it went down to 50% off. It is the last of the Kasha lining in my stash, so the rest of the year of sewing might be interesting.  


All the fabric was pre-treated at home. The wool fabric was tossed in the dryer with three large damp towel and then steamed pressed. The underlining and lining fabrics were tossed in the washing machine for a spin before finishing up in the dryer before cutting. All the fabrics handled the pre-treatment process very well. The only fabric that I had trouble with was the fusible interfacing when it came to fusing it to the wool. It wouldn't stick and I had to hand baste it to the collar. I machine basted to the front facing pieces.  

The coat was constructed with a variety of stitches. Most of the coat was constructed on the machine with the straight stitch (also known as the basic stitch). Elastic was held in place with the back-stitch.  The start and finish of the seams were constructed with the locking stitch and occasionally I used the back-stitch at these points. The buttonholes were machine stitched with the automatic buttonhole stitch--easy peasy. Hand-stitches included the basting stitch, slip stitch, and the prick stitch. All the buttons were sewn by hand.  

The Stats

Fabric:  6.8 metres (fashion, lining and underlining fabrics)

Buttons:  8 - 7/8" buttons

Interfacing:  1.8 fusible interfacing

Pattern:  Vogue 8934

Time:  I invested 46 hours into the preparation of the fabrics and construction of this coat.

Additional Tools and Supplies:  Sewing machine, walking foot, buttonhole foot, regular presser foot (for top-stitching), serger, threads (for the serger, sewing machine and hand-stitching), cutting table, scissors, thread clippers, pins, hand needle, wax, tailor's chalk, steam iron, ironing board, about 1 L water (possibly more for steaming the wool), clapper, tailor's ham, sleeve ham, jazz music and a few breaks for spontaneous dance moves to some good tunes and stretching.  

Happy Sewing!


Tuesday 3 January 2017

Vogue 1410: Waist Slip

I need a waist slip or half slip, if you like, to wear under a couple of my favourite versions of Vogue 1410.


Both the wool crepe and silk versions could benefit from a slip since they can be a wee bit see-through if your standing in the light. So, this waist slip is made specifically for these dresses. 


I pulled out my copy of the Lynn Mizono dress pattern and used it as my template for the waist slip. I folded the top portion of the front pattern piece and cut two pieces. Since the front and back below the waist are the exact same shape and size, I only used the front pattern piece. After I cut it out I trimmed at the waist so that it wouldn't be as full as the dress. And the length was shortened  by two inches.   


It seriously was a quick make. Re-threading the serger took more time than sewing this project. I only used a couple of stitches to complete this item. Most of the sewing was done with the stem stitch (also known as the lightening bolt, stretch and knit stitch) on my sewing machine. The stem stitch is a very narrow zigzag and is designed for sewing knits. The seam edges were finished with an overlock stitch on my serger. There was no hand-stitching one this project.   

I found the fabric at Northwest Fabrics last month. It was pre-treated with a tumble through the washing machine on the delicate setting and then the dryer with some fabric softener. I'm pretty happy with how it feels under the dresses. I didn't want a full length slip because I typically wear a t-shirt or top under my dresses, so this one is perfect for the job. 


The Stats:  

Fabric:  1.8 metres

Elastic:  0.8 metres 1/2" elastic

Pattern:  Vogue 1410

Time:  I invested two hours into the construction of this slip

Additional Supplies & Tools:  Sewing machine, walking foot, serger, threads, pins, scissors, thread clippers, and a chai latte break. 

Happy Sewing! 

Stash busting: Wool cardigan / OOP Kwik Sew 4192

Back in September, I made a simple pull-on  wool knit skirt with the intention of sewing a matching pullover top  to go with it.  The pullo...